Bluetooth GPS: Anatomy of a Bad Elf GPS Receiver

Legacy Content: This article references our end of life product. For recommended product alternatives, see
Choosing the Right GPS/GNSS Receiver for Your Work →
As a field data collection professional, you want the best performance possible from your Bad Elf Bluetooth GNSS Receiver. Out of the box, you can expect the performance of the receiver to exceed a receiver embedded in a handheld device. However, you want to get the best performance from your Bad Elf, not just better performance than from your handheld. Understanding the anatomy of a Bad Elf receiver can help you get the desired performance.
ANTENNA
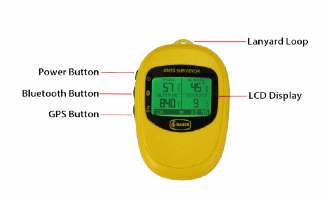
On the face of the Bad Elf Bluetooth GPS Receiver, you easily identify the placement of the LCD for feedback. Below the faceplate overlaying the LCD is a flat blank space just below the Bad Elf logo. That’s where you find the GPS antenna. The antenna achieves best reception when facing toward the sky with an unobstructed view. In other words, for best results you want the Bad Elf receiver on it’s back with its face skyward and perpendicular to the ground.
BAROMETRIC ALTIMETER
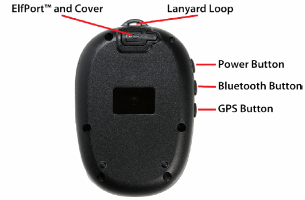
On the back of the Bad Elf GPS Receiver, you can find two pin holes toward the lower end of the unit. Behind those holes is the barometric sensor, which is protected by a waterproof layer that prevents water from entering the device, but allows air pressure to be monitored.
CONTROLS
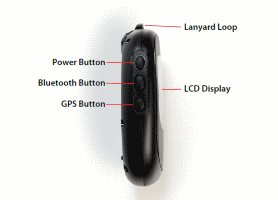
The Bad Elf receiver has three buttons to the left of the front LCD display. These are your main unit controls. The top button controls power and the LCD backlight, the middle button controls Bluetooth and barometer settings, while the bottom button controls general GPS functions. More extensive capabilities are available through the free, downloadable Bad Elf utility app available through iTunes.
Power Button
- Press and hold this button for 3 seconds to toggle the Bad Elf GPS device ON or OFF.
- Press this button momentarily to toggle the LCD backlight ON or OFF.
Bluetooth Button
- Press and hold this button for 3 seconds to toggle the Bluetooth radio ON or OFF.
- Press this button momentarily to move through the Bluetooth related screens.
GPS Button
- Press and hold this button for 3 seconds to toggle the GPS Data Logging ON or OFF.
- Press this button momentarily to move through the GPS related screens. Each button can be used as a simple click or as a press and hold action. See the scenarios below for details of operation using the buttons in each context. Additional configuration and features are controlled wirelessly via the Bad Elf GPS utility app.


DISPLAY
The Bad Elf GPS display is a standard backlit LCD screen which you can interact with via the three button controls along the left side of the unit. When initially powered on, you will first see a Bad Elf splash screen with the Bad Elf logo and device information (model and firmware version). Using the buttons along the left side, you will be able to navigate through the display. Further information concerning the quality of data and satellite usage is also available directly on the device. Additionally, users may check Bluetooth connection status, battery levels, barometer, thermometer, and data log storage usage at a glance. The display also has a backlight for readability at night.
ATTACHMENTS
At the very top if the GPS receiver is a small opening through which you can attach the supplied lanyard or any similar sized tether to restrain the Bad Elf GPS receiver. Some customers also attach high performance Velcro to the flat backside of the unit in order to position it on a small platform or mount with the antenna facing in the optimal position.
USB PORT
The USB port at the top of the back of the GPS receiver comes with a rubber cap. While the front and back of the enclosure fit together with an O-ring between them to keep out moisture, ensuring a tight seal of the USB cap will keep water from infiltrating the enclosure when splashed in rain or around water. Of course, the GPS receiver is only rated IPX-4, so it is never safe to submerge the unit.
POWER SUPPLY
The Bad Elf GPS includes a long life, embedded lithium-ion battery. When both the Bluetooth® radio and the GPS are active, the battery offers more than 24 hours of continuous operation on a single charge. When operating in standalone data logging mode, that is, with the Bluetooth radio OFF, the Bad Elf GPS can operate for over 32 hours.
Related Articles
Bad Elf GPS: Downloading trips
Legacy Content: This article references our end of life product. For recommended product alternatives, see Choosing the Right GPS/GNSS Receiver for Your Work → The Bad Elf GPS app is used to download trips that have been logged locally to the Bad Elf ...Bluetooth GPS: How to Control Data Logging on a Bad Elf GPS
Legacy Content: This article references our end of life product. For recommended product alternatives, see Choosing the Right GPS/GNSS Receiver for Your Work → Data logging is a feature found on the Bad Elf GPS Bluetooth models; The Bad Elf GPS Pro, ...Bluetooth GPS: Pairing a Bluetooth Bad Elf with Android
Legacy Content: This article references our end of life product. For recommended product alternatives, see Choosing the Right GPS/GNSS Receiver for Your Work → Connecting a Bluetooth Elf to your phone or tablet couldn't be easier, just follow these ...Bluetooth GPS: Pairing a Bluetooth Bad Elf with iOS
Legacy Content: This article references our end of life product. For recommended product alternatives, see Choosing the Right GPS/GNSS Receiver for Your Work → Connecting a Bluetooth Elf to your phone or tablet couldn't be easier, just follow these ...Bluetooth GPS: Bluetooth Settings
Legacy Content: This article references our end of life product. For recommended product alternatives, see Choosing the Right GPS/GNSS Receiver for Your Work → Here is a breakdown of the Bluetooth settings within the Bad Elf GPS app for the Bad Elf ...