Bad Elf Flex: Windows NTRIP Setup
Bad Elf Flex: Windows NTRIP Setup
Introduction
If your organization requires a Windows 10 or 11 application for data collection; streaming real-time corrections with RTK via NTRIP requires an alternative workflow to the Bad Elf Flex mobile app on Android and iOS. This alternative process is necessary due to the distinct operating systems and their methods of interfacing with external GNSS receivers.
Windows requires two third-party applications: RTKLIB and GPSComplete.
This guide walks you through connecting your Windows data collection system to a Bad Elf GNSS receiver via Bluetooth, setting up the RTKLIB STRSVR NTRIP client to connect to the corrections network, and using GPSComplete to send NMEA data to your chosen data collection application.
These instructions apply to both the Bad Elf Flex and the Bad Elf Flex Mini.

The Bad Elf Flex Mini requires corrections in RTCM 3.2 format or later, including MSM4 or MSM5 messages.
Resources
Windows Configuration
Bluetooth Configuration
- Power on the Bad Elf receiver
- Starting from the Bluetooth Settings in the windows taskbar, select the option Add a Bluetooth Device
- Allow Windows to scan for Bluetooth devices. Your receiver appears as Bad Elf Flex or Bad Elf Flex Mini followed by the serial number
- Pair with your receiver accept all the standard prompts
- Once pairing is complete, locate the section in the Bluetooth Settings labeled “More Bluetooth Settings”
- Select the tab labeled “COM Ports”
- Identify on the list the COM port associated with your Flex receiver that has the additional identifier “SPP RFCOMM”
- In this example COM6 is the port used for serial communication
USB Configuration
- Power on the Bad Elf receiver
- Attach the Bad Elf receiver via a USB cable to the Windows PC
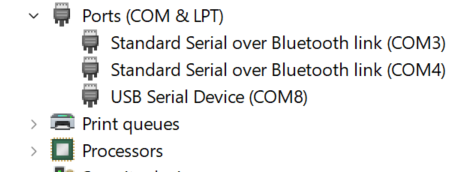
- Open the Windows Device Manager
- Select the tab labeled “Ports (COM & LPT)”
- Identify on the list the COM port associated with your Flex receiver that has is identified as a USB Serial Device”
- In this example COM8 is the port used for serial communication
RTKLIB - STRSVR.EXE Configuration
- Run strsvr.exe
- Configure the NTRIP input source - stream (0) Input
- Select NTRIP Client from the pulldown list
- Select the “...” under Opt
- The NTRIP Client Options dialog is shown
- Enter your caster domain name or IP
- Enter the port number
- If you know the Mountpoint enter it manually
- If you need to select a Mountpoint, click the button “Get Mountp” and select the Mountpoint from the list
- Enter your User ID and Password
- Click “OK” to finish
- Configure the output - stream (1)
- Select Serial from the pulldown list
- Select the “...” under Opt
- The Serial Options dialog is shown
- Using the serial port identified from Bluetooth setup, configure the dialog as shown
- Click “OK” to finish
You may use a different port number but must use this port number in all places. Please use a port number that doesn’t conflict with other standard port numbers
- Click on the “Options” button to confirm settings
- Click “Ok” to finish
If you are using a VRS or network solution ensure Relay Messages is set to (1) -> (0).
For single baseline, Relay Messages can be left at “None”.
- Click the “Start” button to verify connection
- Confirm the Bytes listed for both streams are increasing and equivalent
The Bps numbers may vary between the two streams.
Configure GPSComplete
- Execute GPSComplete
- Confirm all sections indicate “Not Installed”
- In the section labeled GPSDirect driver, click on “Install Driver”
- Using the port number configured in strsrv, enter the values shown
- Click “Ok” to finish
- A dialog appears to confirm installation is complete
- If your application uses Windows ILocation services, no further configuration is required
- If your application requires a serial port connection, continue to the next step
- In the section labeled “COM Port driver”, click on “Install Driver”
- Ensure the “User Sensor” selected is GPSDirect
- Select the outputs RMC,GGA, GSA, GSV
- Click “OK” to finish
- Confirm driver is installed
- The virtual COM port created is indicated in the GPS Reverse section, in this case COM7
- Use this COM port in your application software to connect to the NTRIP corrected NMEA stream
- The strsrvr.exe application may be started from the command line or manually upon reboot or shutdown
- The GPSComplete configuration is only required once and does note need to be completed between reboot or shutdown
Related Articles
Bad Elf Flex: Anatomy of a Flex
The Bad Elf Flex GNSS device has an interface that will allow users to use the front buttons and LCD to navigate and adjust settings, as well as use the various functions of the Flex. Product Overview - Front Antenna cap: A removable cap that ...Bad Elf Flex: Bluetooth Pairing with Android
Connect your Bad Elf GNSS receiver to your Android phone or tablet by following these simple steps: Close the Bad Elf Flex app on Android if you have not already. Power ON your Bad Elf Flex by pressing and holding the power button for 1 second. On ...Bad Elf Flex: Bluetooth Pairing with iOS
Connecting a Bad Elf Flex to your phone or tablet couldn't be easier, just follow these simple steps: Power ON your Bad Elf Flex by pressing and holding the power button for 1 second On your iOS Device, open the Settings app, tap Bluetooth, and turn ...Bad Elf Flex: Base/Rover Setup
Initial Configuration Instructions Please update the firmware on the Bad Elf Flex, update the Bad Elf Flex app, and update your mobile device operating system to the latest version. Unpair all devices from both Bad Elf Flexes under Bluetooth -> Clear ...Bad Elf Flex: Configuring ArcGIS Field Maps
Bad Elf Flex: Configuring ArcGIS Field Maps Problem When using the Bad Elf Flex or Flex Mini with ArcGIS Field Maps, certain settings must be understood and configured. Streaming corrections via RTK over the internet can further complicate these ...